
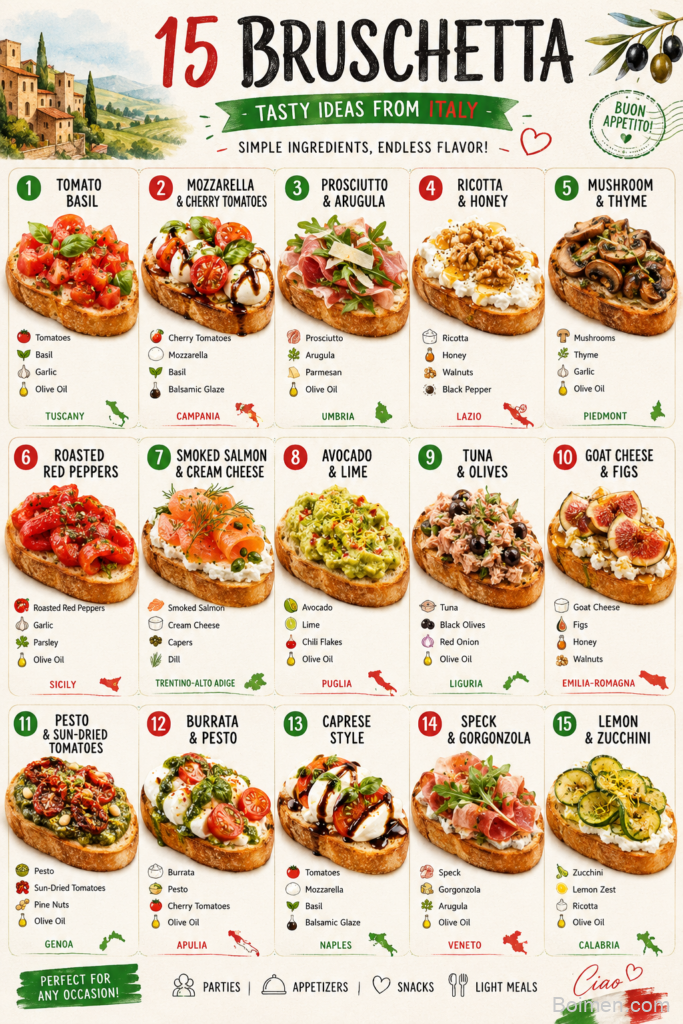
Let's be honest, a Pinterest image is not a recipe you eat, it is the recipe you sell before anyone reads a single word. I learned this the hard way after posting gorgeous dishes that nobody pinned, then watching a plain bowl of soup go viral because the photo made people stop scrolling.
Advertisements1
In this guide I will walk you through exactly how I build a Pinterest image for my food blog, from the lighting and the props to the text overlay and the pin dimensions. You do not need a fancy camera, you need a window, a sturdy surface, and about 35 minutes of patience.
Think of this as your styling session, not a cooking session, so grab your best-looking dish, your favorite linen, and let's make something that earns clicks. Cook smart, eat happy.
Why You'll Love This Recipe
About the Ingredients
1 large window with soft, indirect daylight
North or east facing windows give the most even light all day. If your only window faces south, hang a sheer white curtain to diffuse harsh sun.
1 white foam board or large white poster board
This acts as your bounce card to fill shadows on the dark side of the dish. A sheet of parchment taped to cardboard works in a pinch.
2 to 3 styling surfaces such as a wood board, marble slab, or linen runner
Mix textures so the pin has depth instead of a flat background. A thrifted wooden cutting board is my favorite cheap upgrade.
1 hero dish, fully styled and garnished
Choose the version of your recipe that looks most appetizing, not the biggest portion. Add a fresh herb or drizzle right before shooting so it looks alive.
3 to 5 props like a linen napkin, vintage fork, or small bowl of ingredients
Keep props in the same color family as the food so nothing competes for attention. Odd numbers of props always look more natural than even ones.
1 clean cloth and a small brush for touch-ups
Wipe drips and crumbs off the rim of the bowl before every shot. A dry pastry brush removes stray crumbs from the board instantly.
1 smartphone or camera set to vertical 2:3 framing
Pinterest favors a 2:3 vertical ratio, so shoot tall from the start instead of cropping later. Most phones let you lock the aspect ratio in the camera settings.
1 text overlay in a bold, readable font
Use two fonts maximum, one bold for the recipe name and one simple for a short tagline. Keep the text in the top third so it does not cover the food.
Tips & Tricks
- Shoot at a 45-degree angle for most dishes and straight down for flat foods like pizza or cookies. The angle should match how a person would actually see the food on their plate.
- Move the dish, not the light, when you want a different look. Rotating the plate 90 degrees changes the shadows far more than adjusting your camera position.
- Leave negative space in the top third of the frame for your text overlay. If the food fills every corner, your title will look cramped and unreadable on mobile.
- Take at least fifteen shots from three angles before you stop. The best frame is almost never the first one, and digital film is free.
Pro Tips
Step-by-Step Instructions
1. Set up near a window
Place your table about three feet from a window with soft, indirect light, never in direct sun. Direct sun creates harsh shadows and blown-out highlights that make food look flat and unappetizing.
2. Build your background
Lay down your wood board or marble slab, then add a linen runner at a slight angle for texture. A tilted runner adds movement and keeps the background from looking stiff and catalog-like.
3. Style the hero dish
Plate your food with the tallest, most textured side facing the camera, then garnish with a fresh herb or drizzle. Garnishes should look intentional and fresh, so add them seconds before you shoot.
4. Position your bounce card
Hold the white foam board on the side opposite the window, about a foot from the dish, angled toward it. This fills the shadow side and makes the food glow without any artificial light.
5. Shoot from three angles
Start at a 45-degree angle, then shoot straight down, then get low and close for a texture shot. Fire off at least five frames per angle and check focus on the garnish or the juiciest detail.
6. Add your text overlay
Open your favorite editing app and place the recipe name in the top third using a bold font with a subtle drop shadow. Keep the overlay under six words so it stays readable at thumbnail size.
7. Export and check small
Export at 1000 by 1500 pixels and view the image on your phone at thumbnail size before uploading. If the dish and the text both read clearly at two inches wide, your Pinterest image is ready to post.
Delicious Variations
Moody Dark and Dramatic
Swap the white board for a dark slate or black backdrop and shoot with side light for a restaurant-style pin that stands out in a bright feed.
Bright and Airy Flat Lay
Use a white marble surface with pastel props and shoot straight down for a clean, minimal pin that works beautifully for baked goods.
Cozy Lifestyle Scene
Add a mug of coffee, a rumpled napkin, and a hand holding a fork to make the pin feel like a real moment instead of a studio shot.
How to Store Pinterest Image
Refrigerator
Store any leftover styled food in an airtight container in the refrigerator for up to 3 days, then re-style a fresh plate for your next photo session.
Freezer
Freeze the actual recipe, not the styled plate, in a freezer-safe container for up to 2 months, and thaw overnight before reheating for a reshoot.
Reheating
Reheat leftovers in the microwave on high for 60 to 90 seconds, or in a 350F (175C) oven for 10 minutes, then add a fresh garnish before photographing again.
Frequently Asked Questions
Q: What size should a Pinterest image be?
The ideal Pinterest image size is 1000 by 1500 pixels, which is a 2:3 vertical ratio. This tall format takes up more space in the feed and consistently earns more saves than square or horizontal images.
Q: Do I need a professional camera to make a good Pinterest image?
No, a modern smartphone shoots excellent Pinterest images when you use soft window light. The lighting, styling, and composition matter far more than the camera body or lens.
Q: Should I put text on my Pinterest image?
Yes, a short text overlay dramatically improves click-through because people instantly know what the pin is about. Keep it under six words, use a bold font, and place it in the top third of the frame.
Q: What is the best lighting for food photography at home?
Soft, indirect daylight from a large window is the best and most flattering light for food photography. Shoot within three feet of the window, avoid direct sun, and use a white board to bounce light into the shadows.
Q: How many pins should I create for one recipe?
Create three to five different pins per recipe using varied angles, backgrounds, and text overlays. Pinterest rewards fresh images, and multiple pins give you more chances to rank in search.
Pick your most photogenic recipe this week, set up next to your brightest window, and shoot five pins in one sitting. Once you nail the lighting and the text overlay, your Pinterest image will keep bringing hungry readers to your blog for months. Cook smart, eat happy.

Pinterest Image
Pinterest Image shows you how to create scroll-stopping food photos that get saved and clicked, with one concrete benefit: more traffic to your recipes.
🧂 Ingredients
- 1 large window with soft, indirect daylight
- 1 white foam board or large white poster board
- 2 to 3 styling surfaces such as a wood board, marble slab, or linen runner
- 1 hero dish, fully styled and garnished
- 3 to 5 props like a linen napkin, vintage fork, or small bowl of ingredients
- 1 clean cloth and a small brush for touch-ups
- 1 smartphone or camera set to vertical 2:3 framing
- 1 text overlay in a bold, readable font
📋 Instructions
- 1Set up near a window — Place your table about three feet from a window with soft, indirect light, never in direct sun. Direct sun creates harsh shadows and blown-out highlights that make food look flat and unappetizing.
- 2Build your background — Lay down your wood board or marble slab, then add a linen runner at a slight angle for texture. A tilted runner adds movement and keeps the background from looking stiff and catalog-like.
- 3Style the hero dish — Plate your food with the tallest, most textured side facing the camera, then garnish with a fresh herb or drizzle. Garnishes should look intentional and fresh, so add them seconds before you shoot.
- 4Position your bounce card — Hold the white foam board on the side opposite the window, about a foot from the dish, angled toward it. This fills the shadow side and makes the food glow without any artificial light.
- 5Shoot from three angles — Start at a 45-degree angle, then shoot straight down, then get low and close for a texture shot. Fire off at least five frames per angle and check focus on the garnish or the juiciest detail.
- 6Add your text overlay — Open your favorite editing app and place the recipe name in the top third using a bold font with a subtle drop shadow. Keep the overlay under six words so it stays readable at thumbnail size.
- 7Export and check small — Export at 1000 by 1500 pixels and view the image on your phone at thumbnail size before uploading. If the dish and the text both read clearly at two inches wide, your Pinterest image is ready to post.

Elena focuses on healthy cooking and meal prep for people with limited time and budget. She shares flexible recipes and shortcuts that don’t sacrifice flavor.


Leave a Comment