
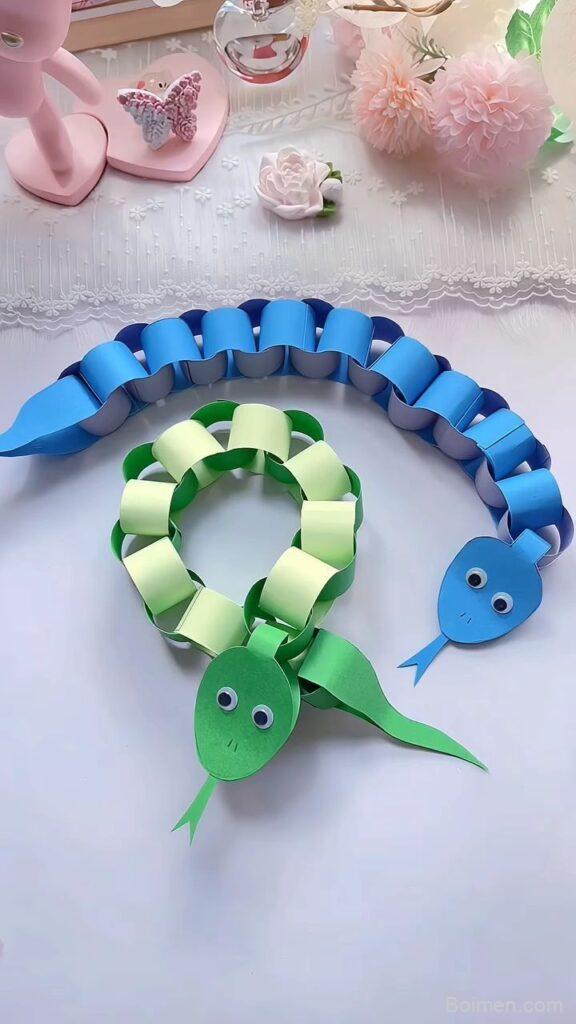
You can turn a few sheets of paper into a jointed snake that slithers and coils with surprising realism. These seven hacks—from paper grain to beeswax—will make your paper chain snake toy sturdier, more beautiful, and endlessly playable.
Advertisements1
- Cut strips along the paper's grain to prevent tearing and ensure smooth curling.
- Use 1 cm wide strips for the best balance of flexibility and strength.
- Interlock loops tightly but not too tight—snug joints allow realistic movement.
- A hidden thread core acts as a spine, keeping the snake from stretching out.
- A tapered tail and defined head make the snake look alive.
- A beeswax finish adds durability and a subtle, tactile sheen.
Why Paper Chain Snakes Captivate
Paper chain snakes are more than a craft; they are a study in movement. Each loop is a vertebra, and the way they flex mimics the lateral undulation of a real serpent. I first made one on a rainy afternoon in my grandmother's kitchen, using strips torn from an old atlas. The snake coiled across the table, and for a moment, the room felt alive.
The secret is in the tension between loops. Too tight, and the snake is stiff; too loose, and it flops. The right balance creates a fluid, almost hypnotic motion. That balance is what we'll chase in these hacks.
Hack 1: Choose Paper with the Right Grain Direction
Paper has a grain—a direction in which the fibers align. When you cut strips, align them with the grain, not against it. Strips cut with the grain curl smoothly and resist tearing; against the grain, they crack and fray.
To find the grain, gently flex the paper. It bends more easily along the grain. Mark that direction with a pencil line before cutting. Why it works: aligned fibers distribute stress evenly, so each loop holds its shape. Common mistake: ignoring grain and cutting strips across it, which leads to weak links that snap when the snake bends.
Hack 2: Cut Strips 1 cm Wide for Optimal Flexibility
Width matters. Strips 1 cm wide (about 0.4 inches) strike the perfect balance: wide enough to hold a loop, narrow enough to flex. Wider strips make a chunky, stiff snake; narrower ones tear easily.
Use a metal ruler and a craft knife for clean edges. If you're using scissors, cut slowly and steadily. Why it works: the width determines the loop's circumference and thus the snake's range of motion. A 1 cm strip yields loops that can bend up to 90 degrees without creasing. Common mistake: cutting strips of varying widths, which creates an uneven, lumpy snake.
Hack 3: Master the Interlocking Loop for Seamless Joints
The classic paper chain uses a simple loop-through-loop technique. But for a snake, you want the loops to interlock tightly so they don't slip. Form a loop, then thread the next strip through it before closing. Pull gently to snug the joint.
Why it works: the interlocking creates a pivot point that allows rotation in multiple directions, mimicking a ball-and-socket joint. Common mistake: pulling too hard, which crushes the loop and restricts movement. Aim for a snug fit, not a strangled one.
Hack 4: Reinforce with a Hidden Thread Core
For a snake that lasts, run a thin cotton thread through the center of all loops. Tie a knot at the head end, then thread through each loop as you build. This core acts as a spine, preventing the snake from stretching out of shape.
Why it works: the thread bears the tensile load, so the paper loops only handle bending. Common mistake: using thick yarn, which adds bulk and stiffness. Use sewing thread or embroidery floss—it's strong and nearly invisible.
Hack 5: Shape the Head and Tail for Realism
The head should be slightly larger and more angular. Cut a triangular piece for the head, fold it to create a jaw, and attach it to the first loop. For the tail, taper the last few loops by cutting progressively narrower strips.
Why it works: a tapered tail and defined head give the snake a sense of direction and life. Common mistake: making the head too heavy, which causes the snake to droop. Keep it lightweight—paper, not cardboard.
Hack 6: Add Texture with a Beeswax Finish
Rub each strip with a thin layer of beeswax before looping. It gives the paper a subtle sheen and a soft, tactile finish. Beeswax also adds moisture resistance, so the snake survives sticky fingers.
Why it works: wax fills the paper's pores, making it more durable and slightly translucent. Common mistake: applying too much wax, which attracts dust and makes the paper slippery. A little goes a long way—rub on, then buff with a cloth.
Hack 7: Store and Display on a Coiled Stand
When not in play, rest your snake on a coiled stand—a simple spiral of wire or a wooden dowel bent into a circle. This keeps the loops relaxed and prevents kinks.
Why it works: gravity pulls the snake into its natural curve, maintaining flexibility. Common mistake: storing it stretched out or in a tight ball, which fatigues the paper. A stand also turns your snake into a piece of art.
The Hacks, Step by Step
- 1Gather materials
You'll need 20-30 strips of paper (1 cm wide, 15 cm long), scissors or craft knife, ruler, cotton thread, beeswax, and optional decorations. Choose paper with a grain direction you can identify. - 2Cut strips with grain
Cut strips along the grain to prevent tearing. Use a ruler for straight edges. Aim for consistent width—1 cm is ideal. - 3Thread the core
Cut a length of thread about twice the desired snake length. Tie a knot at one end and thread through the first loop. This will be the spine. - 4Form the first loop
Take a strip, form a loop, and secure with a small piece of tape or glue. Thread the next strip through this loop before closing it. Pull snug. - 5Continue interlocking
Repeat, threading each new strip through the previous loop. Keep the thread core running through the center. Work steadily, adjusting tension. - 6Shape head and tail
For the head, cut a triangular piece and fold to create a jaw. Attach to the first loop. For the tail, use narrower strips for the last few loops to taper. - 7Apply beeswax
Rub a thin layer of beeswax on each strip before looping, or after assembly for a glossy finish. Buff with a soft cloth. - 8Display and store
Coil the snake on a stand when not in use. Avoid stretching it out or crushing it into a ball.
The magic of a paper chain snake lies in the tension between loops—too tight and it's stiff, too loose and it's lifeless.
Frequently Asked Questions
What kind of paper is best for a paper chain snake?
Lightweight but sturdy paper like construction paper or scrapbook paper works best. Avoid tissue paper (too flimsy) and cardstock (too stiff).
How many loops should a paper chain snake have?
Aim for 20 to 30 loops for a snake about 30-45 cm long. You can adjust based on desired size.
How do I make the snake's head?
Cut a triangular piece of paper, fold it to create a jaw, and attach it to the first loop. You can draw eyes with a marker.
Can I paint or decorate the snake?
Yes, but do it before assembly. Watercolors can warp paper, so use acrylics or markers sparingly.
How do I store the snake to keep it from getting crushed?
Coil it loosely on a stand or in a box with tissue paper. Avoid tight spaces.



Leave a Comment