
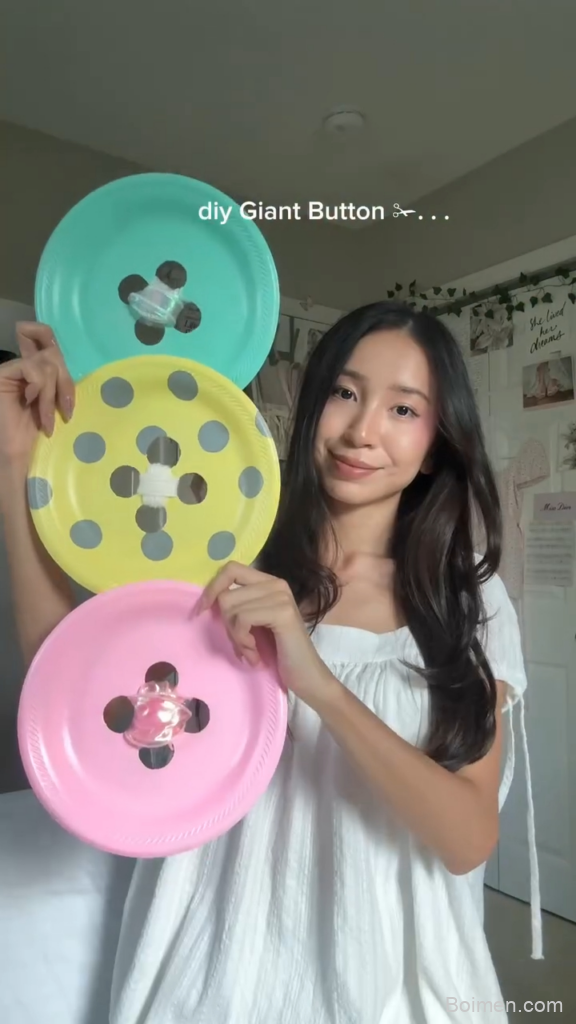
Turn a dollar-store plastic plate into a giant button that looks like it popped off a clown's shirt! With these 7 hacks, you'll get a sturdy, glossy prop in under an hour—perfect for costumes, decor, or photo booths. Let's dive in!
Advertisements1
- Use a sturdy 9-inch plastic plate—flimsy ones crack when cut.
- Score and snap for clean edges, then sand smooth.
- Drill holes at low speed to avoid cracking.
- Apply thin coats of acrylic paint for a professional finish.
- Seal with Mod Podge Gloss for durability and shine.
- Attach the shank with E6000 and let cure for 24 hours.
Why a Plastic Plate Makes the Perfect Giant Button
Plastic plates are lightweight, cheap, and already have a slight curve that mimics a real button's domed shape. A standard 9-inch plate gives you a 3-inch button after trimming, which is perfect for most crafts. I've tried cardboard and foam, but plastic holds paint better and won't warp when you add glue. Plus, you can find them at any dollar store in packs of 20 for a buck.
One mistake: using a flimsy plate that cracks when you cut it. Look for sturdy melamine or thick disposable plates—avoid thin, flexible ones. If you're in a pinch, a plastic lid from a takeout container works too, but you'll need to sand the edges.
Gather Your Supplies: What You Really Need
Here's your shopping list, in order of importance: a 9-inch plastic plate (any color, but white or clear is easiest to paint), a 2-inch circle template (a jar lid or a cup), a craft knife or heavy-duty scissors, fine-grit sandpaper (220-grit), acrylic paint in your chosen color, a foam brush, a clear gloss sealer (Mod Podge or spray lacquer), and a 1-inch button shank (or a large safety pin). Optional: a drill with a 1/8-inch bit for the holes.
Substitutions: No button shank? Use a paperclip bent into a loop and hot-glued to the back. No acrylic paint? Nail polish works in a pinch, but it's pricier. No sealer? Clear nail polish adds shine, but it might yellow over time. I keep a stash of these supplies in a shoebox—total cost under $10.
Hack 1: Score and Snap for Clean Edges
Instead of struggling with scissors, score the plate along your traced circle with a craft knife, then snap the excess away. This gives you a smooth edge with minimal sanding. Why it works: scoring creates a weak line that breaks cleanly, like cutting glass. I use a metal ruler as a guide for straight cuts, but for circles, freehand is fine—just go slow.
Common mistake: pressing too hard and cracking the plate. Use light pressure and multiple passes. After snapping, sand the edge with 220-grit until it's buttery smooth. This takes about 2 minutes and prevents cuts later.
Hack 2: Add Realistic Button Holes with a Drill
Real buttons have two or four holes in the center. To mimic that, mark two dots 1/2 inch apart in the middle of your disc. Use a 1/8-inch drill bit to make clean holes—plastic plates drill like butter. Why it works: drilled holes have crisp edges, unlike melted holes from a hot nail. If you don't have a drill, a hot glue stick and a lighter can melt holes, but it's messier.
Mistake: drilling too fast, which can crack the plastic. Run the drill at low speed and back it out often to clear shavings. After drilling, sand the holes lightly to remove burrs. Now your button looks authentic!
Hack 3: Paint Like a Pro with Thin Coats
Acrylic paint is your best friend here. Apply two to three thin coats with a foam brush, letting each dry for 10 minutes. Why it works: thin coats prevent brush strokes and drips, giving a factory-smooth finish. I use a hairdryer on cool to speed up drying between coats. For a two-tone button, paint the rim a contrasting color using painter's tape.
Mistake: slathering on thick paint, which pools and looks lumpy. Also, don't skip the sealer—it protects against scratches and gives that glossy, plastic-like sheen. I recommend Mod Podge Gloss; it dries clear in 20 minutes.
Hack 4: Attach a Shank That Won't Pop Off
A button shank is the loop on the back that lets you sew it onto fabric. For a giant button, you can glue a plastic shank (from a sewing store) or DIY one with a paperclip. Why it works: a shank distributes weight evenly, so your button hangs flat. Use E6000 glue for a permanent bond—hot glue will fail under stress. Let it cure for 24 hours.
Mistake: gluing the shank off-center. Mark the center with a dot before gluing. If you're making a pin instead, hot-glue a safety pin to the back, but reinforce it with a small square of felt. I've worn a 3-inch button pin all day at Comic-Con without it budging.
Hack 5: Weatherproof Your Button for Outdoor Use
If your button will be outside (like on a garden flag), seal it with a UV-resistant clear coat. Spray lacquer designed for plastics works best—two coats, 10 minutes apart. Why it works: it blocks UV rays that fade paint and makes the button water-resistant. I've had a button on my porch for six months, and it still looks new.
Mistake: using indoor sealer, which yellows and peels. Also, avoid water-based sealers for outdoor use. Test on a scrap piece first. If you're in a hurry, clear nail polish works for small touch-ups, but it's not durable long-term.
The Hacks, Step by Step
- 1Trace and Cut the Plate
Place a 2-inch circle template in the center of a 9-inch plastic plate. Trace with a permanent marker. Score along the line with a craft knife, then snap away the excess. Sand edges smooth with 220-grit sandpaper. Why: This gives you a perfect circle without jagged edges. - 2Drill the Button Holes
Mark two dots 1/2 inch apart in the center. Drill through with a 1/8-inch bit at low speed. Sand the holes lightly. Why: Real buttons have holes, and drilling gives clean, professional-looking openings. - 3Paint with Thin Coats
Apply two to three thin coats of acrylic paint with a foam brush, drying 10 minutes between coats. Why: Thin coats prevent drips and brush marks, resulting in a smooth, glossy finish. - 4Seal with Gloss Mod Podge
Brush on a coat of Mod Podge Gloss and let dry for 20 minutes. Why: The sealer protects the paint and adds a shiny, plastic-like finish that makes the button look authentic. - 5Attach the Shank
Glue a plastic button shank to the center back with E6000. Let cure for 24 hours. Why: A shank allows you to sew the button onto fabric or attach a pin, and E6000 holds strong.
The secret to a realistic giant button is in the details: crisp holes, a glossy finish, and a sturdy shank.
Frequently Asked Questions
What kind of plastic plate works best for a giant button?
Sturdy melamine or thick disposable plates work best. Avoid thin, flexible plates that crack when cut. A 9-inch plate yields a 3-inch button after trimming.
How do I make the button holes without a drill?
You can melt holes with a hot nail held with pliers, but it's messier. For clean holes, a drill with a 1/8-inch bit at low speed is best.
Can I use this giant button outdoors?
Yes, if you seal it with a UV-resistant clear coat. Indoor sealers will yellow and peel. Spray lacquer for plastics works well.
What glue should I use to attach the shank?
E6000 is the best choice for a permanent bond. Hot glue will fail under stress. Let it cure for 24 hours before using.
How long does it take to make a giant button?
About 45 minutes of active time, plus drying and curing. Painting and sealing take the longest, but you can speed up with a hairdryer on cool.



Leave a Comment