
There is a particular quiet that settles over a table when small hands are busy. A bowl of river stones, a few brushes, and the afternoon light slanting across the wood. That is where this project begins.
Advertisements1
Painting rocks to look like food is not really about the rocks. It is about the way a gray pebble becomes a strawberry, the way a child leans in close to get the seeds just right. Thirteen little ideas, one calm afternoon.
Gather smooth stones from a craft store or a riverbank, and let the kitchen table become a tiny bakery. Nothing here needs to be perfect. The charm lives in the wobble of the frosting.
Why You'll Love This Recipe
About the Ingredients
24 to 30 smooth river rocks, roughly 1 to 3 inches each
Look for stones with a flat base so they sit without rolling. Craft stores sell polished river rock by the bag, and dollar stores often carry them too; skip rough lava rock, which drinks the paint unevenly.
1 set of acrylic craft paints, at least 12 colors including red, yellow, white, brown, and green
Acrylics dry fast and bond to stone. If you only have tempera, mix it with a drop of white glue so it does not flake off; acrylic is worth the small upgrade.
1 fine-tip detail brush and 1 flat 1/2-inch brush
The flat brush covers the base coat in two passes, and the fine tip handles sesame seeds and sprinkles. A cheap eyeliner brush from the drugstore works beautifully for tiny dots.
1 small bottle of matte acrylic sealer or clear spray varnish, about 3 ounces
Matte keeps the food looking real rather than plastic. Brush-on Mod Podge in matte finish is a fine substitute and is easier to use indoors with children.
1 palette or paper plate for mixing colors
A plain white plate lets you judge color accurately. A ceramic plate wipes clean with warm water between batches.
1 cup of water in a small jar for rinsing brushes
Change the water between color families so reds do not muddy your whites. A second jar for clean water keeps the final highlights crisp.
4 to 6 paper towels or a lint-free cloth
Blot brushes after rinsing so the paint does not turn watery. Old cotton t-shirts cut into squares work better than paper towels and leave no fibers.
1 pencil, for sketching faint outlines
A soft 2B pencil marks stone without scratching it. Graphite erases from sealed stone, but a damp cloth lifts most of it before the base coat goes on.
Tips & Tricks
- Wash and dry the stones a full day ahead. Dust and river grit keep acrylic from gripping, and a stone that still feels cool and damp will make the paint bead up.
- Paint in thin layers rather than one thick coat. Two or three light passes dry smoother and hide brush marks, while a heavy coat cracks as it cures.
- Let each color dry for about 10 minutes before adding the next. Acrylic skin-forms quickly, and dragging a wet brush across a half-dry strawberry smears the whole shape.
- Seal only after 24 hours of full drying. Sealing too soon traps moisture under the varnish and turns the finish cloudy.
Pro Tips
Step-by-Step Instructions
1. Wash the stones
Rinse every rock under warm water with a drop of dish soap, scrubbing away grit with your fingers. Spread them on a towel and let them dry completely for at least 24 hours, until they feel room temperature and chalky to the touch.
2. Lay out the workspace
Cover the table with newspaper or a silicone mat and set out paints, brushes, the water jar, and paper towels within easy reach. Good light matters more than good tools here, so work near a window in the afternoon.
3. Base coat each stone
Brush one thin coat of white or a food-appropriate base color over the top and sides, leaving the flat underside bare so the stone still sits level. Let it dry 10 minutes, then add a second thin coat and dry another 10 minutes.
4. Sketch the food shape
With the pencil, lightly draw the outline of your chosen food, a taco curve, a donut ring, a watermelon wedge. Keep the line faint; it is only a guide, and the paint will cover it.
5. Paint the main shapes
Fill in the large areas first, the bun, the crust, the rice, working from light colors to dark so you never have to paint white over red. Rinse and blot the brush between every color change.
6. Add the details
Once the base shapes are dry to the touch, about 10 minutes, add the small marks that make it read as food: grill lines, frosting drips, sesame seeds, a blush of red on a strawberry. Use the fine brush or a toothpick for dots and lines.
7. Dry fully, then seal
Let the finished rocks cure for 24 hours in a dust-free spot. Then brush or spray a thin coat of matte sealer outdoors or by an open window, and let it dry 30 minutes before handling.
8. Arrange and play
Pile the finished food rocks into a shallow bowl or a play kitchen crate. They are ready to sort, serve, and admire, and the matte finish means they can be wiped clean with a damp cloth.
Delicious Variations
Sweet Shop Set
Paint donuts, macarons, and strawberry slices in pastel tones, then dust the donuts with real sprinkles pressed into wet paint before sealing.
Sushi Platter Set
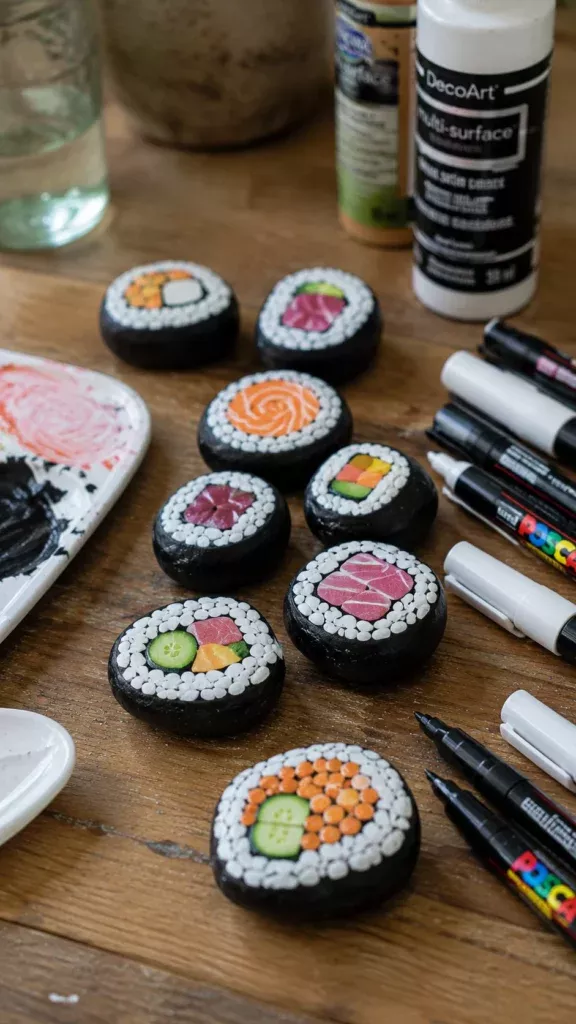
Shape nigiri and maki rolls with white, salmon pink, and deep green nori, and finish with tiny black sesame dots for a surprisingly realistic look.
Breakfast Spread Set
Make fried eggs, toast with jam, and a stack of pancakes, using a soft yellow for yolks and a warm brown for the griddle marks.
How to Store 13 Rocks Painted Like Food DIY Ideas for Creative Fun
Refrigerator
Not applicable; keep finished rocks out of the refrigerator, where moisture can cloud the sealer.
Freezer
Not applicable; freezing will crack the acrylic and sealer.
Reheating
Not applicable. Store finished rocks in an open bowl or basket at room temperature, away from direct sun, and dust them with a dry cloth.
Frequently Asked Questions
Q: What kind of paint works best on rocks?
Acrylic craft paint is the best choice because it bonds to stone and dries hard within about 20 minutes. Tempera works in a pinch but flakes off unless you mix in a drop of white glue, and oil paint takes days to cure.
Q: Do you have to seal painted rocks?
Yes, sealing is strongly recommended if you want the colors to survive handling and sunlight. A matte acrylic sealer protects the paint from scratches and fading, and it takes only about 30 minutes to dry.
Q: How long do painted rocks last?
Sealed painted rocks kept indoors last for years, and even outdoors they hold up for a season or two. Unsealed rocks may fade within a few months in direct sun or wash off after rain.
Q: Can kids do this craft safely?
Yes, this is a wonderful craft for children ages five and up with light supervision. Use non-toxic acrylics labeled AP or CP, keep the sealer step for adults or ventilated outdoor use, and cover the table well.
Q: How do you keep the paint from peeling off smooth rocks?
Wash and fully dry the stones first, then apply a thin white base coat so the paint has something to grip. Two thin coats plus a matte sealer will keep the design intact through normal handling.
Set out the stones this weekend and see what the afternoon becomes. Let the small hands choose their own menu, and keep a bowl of finished pieces on the windowsill where the morning light can find them.
13 Rocks Painted Like Food DIY Ideas for Creative Fun
13 Rocks Painted Like Food DIY Ideas for Creative Fun turns smooth stones into tiny tacos, donuts, and sushi for playful, screen-free afternoons.
🧂 Ingredients
- 24 to 30 smooth river rocks, roughly 1 to 3 inches each
- 1 set of acrylic craft paints, at least 12 colors including red, yellow, white, brown, and green
- 1 fine-tip detail brush and 1 flat 1/2-inch brush
- 1 small bottle of matte acrylic sealer or clear spray varnish, about 3 ounces
- 1 palette or paper plate for mixing colors
- 1 cup of water in a small jar for rinsing brushes
- 4 to 6 paper towels or a lint-free cloth
- 1 pencil, for sketching faint outlines
📋 Instructions
- 1Wash the stones — Rinse every rock under warm water with a drop of dish soap, scrubbing away grit with your fingers. Spread them on a towel and let them dry completely for at least 24 hours, until they feel room temperature and chalky to the touch.
- 2Lay out the workspace — Cover the table with newspaper or a silicone mat and set out paints, brushes, the water jar, and paper towels within easy reach. Good light matters more than good tools here, so work near a window in the afternoon.
- 3Base coat each stone — Brush one thin coat of white or a food-appropriate base color over the top and sides, leaving the flat underside bare so the stone still sits level. Let it dry 10 minutes, then add a second thin coat and dry another 10 minutes.
- 4Sketch the food shape — With the pencil, lightly draw the outline of your chosen food, a taco curve, a donut ring, a watermelon wedge. Keep the line faint; it is only a guide, and the paint will cover it.
- 5Paint the main shapes — Fill in the large areas first, the bun, the crust, the rice, working from light colors to dark so you never have to paint white over red. Rinse and blot the brush between every color change.
- 6Add the details — Once the base shapes are dry to the touch, about 10 minutes, add the small marks that make it read as food: grill lines, frosting drips, sesame seeds, a blush of red on a strawberry. Use the fine brush or a toothpick for dots and lines.
- 7Dry fully, then seal — Let the finished rocks cure for 24 hours in a dust-free spot. Then brush or spray a thin coat of matte sealer outdoors or by an open window, and let it dry 30 minutes before handling.
- 8Arrange and play — Pile the finished food rocks into a shallow bowl or a play kitchen crate. They are ready to sort, serve, and admire, and the matte finish means they can be wiped clean with a damp cloth.

Ingrid explores Scandinavian minimalist design and slow living. She writes about creating calm, functional spaces with fewer, better things.


Leave a Comment