
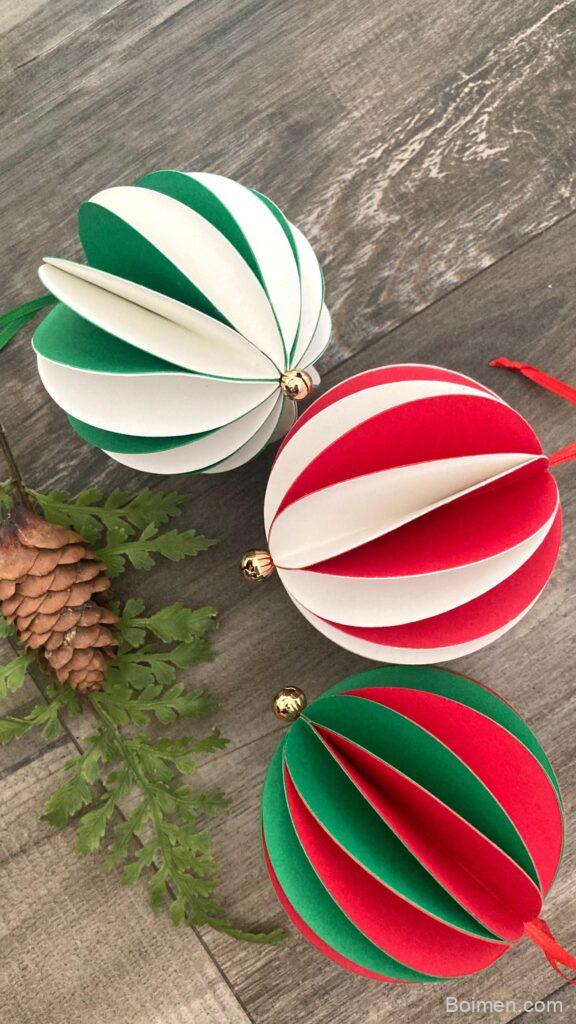
There is a quiet magic in folding paper into light. These honeycomb balls catch the glow of a winter window, and with two tones, they seem to breathe. Here are seven practical hacks to make yours beautifully, without the frustration.
Advertisements1
- Use 80–100 gsm paper for the best balance of flexibility and structure.
- Alternate colors strip by strip for a seamless two-tone blend.
- Glue in a staggered pattern: top, bottom, top, bottom.
- Always punch holes before gluing to avoid tearing.
- Let the glue dry fully before expanding to prevent rips.
- Twist gently to shape, not pull, for a perfect sphere.
Choose the Right Paper Weight
The paper you choose is the soul of the ornament. Too thin, and the honeycomb collapses; too thick, and the folds resist. I have found that 80–100 gsm (about 24–30 lb) is the sweet spot. This weight holds a crisp fold yet allows the paper to open into that airy sphere. For a two-tone effect, pick two colors with similar weight so they stretch and settle together. A common mistake is using cardstock thinking it will be sturdier—it only makes the expansion stiff and the ball lopsided.
Cut Strips with a Paper Cutter for Precision
A rotary paper cutter is not just a convenience; it is a necessity for even strips. I once cut by hand with scissors, and the slight curves in my lines made the honeycomb gape unevenly, like a smile with missing teeth. A cutter gives you straight, identical strips, which are the foundation of a balanced ball. Measure once, cut many. The mistake here is rushing the cutting—if your strips vary by even a millimeter, the final sphere will be noticeably off.
Alternate Colors in a Thoughtful Pattern
For a true two-tone look, you do not simply stack all of one color then the other. Instead, alternate the strips: color A, color B, A, B, and so on. When the ball expands, the colors will interlace like the segments of a citrus fruit, each hue catching the light in turn. If you want a more gradual shift, you can place two strips of one color, then two of the other, but the classic alternating rhythm is the most pleasing. The mistake is to separate the colors into two halves—that creates a stark line rather than a gentle dance.
Glue the Strips in a Staggered Pattern
The honeycomb effect comes from gluing the strips together in a staggered sequence. Lay out your strips vertically, then apply a thin line of glue to the top edge of the first strip, place the second strip on top, then glue the bottom edge of the second strip, and so on. This creates the accordion-like folds. Use a glue stick or a fine-tip glue pen for control. A common mistake is applying too much glue, which seeps out and sticks the folds together, ruining the expansion. Less is more here.
Let the Glue Dry Completely Before Expanding
Patience is a quiet virtue in this craft. After gluing, let the stack dry for at least 15–20 minutes. If you pull the folds apart too soon, the glue will give way, and the paper may tear. I like to place a heavy book on top while it dries to keep the layers flat. The mistake is to test the expansion prematurely—you will feel a slight resistance, and if you insist, you will have to start over. Wait until the glue is crystal clear and the stack feels like one piece.
Punch Holes Before You Glue
Before you assemble the stack, punch two small holes at the top and bottom of the entire stack. Use a hole punch or a needle. These holes will later hold the wire or string for hanging. If you try to punch after gluing, you risk tearing the delicate layers. The mistake is to punch only one hole at the top—a second hole at the bottom helps to pull the ornament into a perfect sphere. You can thread a wire through both and twist to hold the shape.
Shape with a Gentle Twist
When you finally open the honeycomb, do not just pull from the center. Instead, hold the top and bottom wires and twist gently in opposite directions. This motion helps the folds to open evenly, like a fan. You will see the two tones intermingle, and the ball will form a perfect sphere. The mistake is to pull from one side, which can cause the folds to bunch and the ball to look like a teardrop. Twist, then let the paper find its own rest.
The Hacks, Step by Step
- 1Cut 10 strips of each color
Cut 10 strips of each color, each 1 inch wide and 6 inches long. Use a paper cutter for straight edges. - 2Stack and glue in alternating order
Stack the strips alternating colors (A, B, A, B…). Glue them together in a staggered pattern: apply glue to the top of the first strip, place the second, glue the bottom of the second, and so on. This creates the honeycomb folds. - 3Punch holes at top and bottom
While the stack is still flat, punch a hole at the top and bottom through all layers. These holes will hold the hanging wire. - 4Let the glue dry completely
Let the stack dry for at least 15–20 minutes. Place a heavy book on top to keep it flat. Do not rush this. - 5Thread wire through holes and expand
Thread a thin wire through the top and bottom holes, twisting the ends to form a loop. Gently pull the top and bottom apart to expand the honeycomb into a ball. - 6Shape the ball and hang
Twist the top and bottom wires gently to shape the sphere evenly. Then hang your ornament in a window or on a tree, and watch the light play through the two tones.
The magic of a honeycomb ball is in the patience you give it.
Frequently Asked Questions
What kind of paper is best for honeycomb ball ornaments?
80–100 gsm paper is ideal because it holds folds without being too stiff or too flimsy. Regular printer paper or lightweight scrapbook paper works well.
How many strips do I need for a honeycomb ball ornament?
For a small ornament, use 10 strips of each color (20 total). For a larger ball, increase to 15–20 strips per color, adjusting the length and width proportionally.
Can I use a glue gun for honeycomb ornaments?
Yes, but use a low-temp glue gun and apply a very thin line. Hot glue can create bumps and may soak through thin paper, so a glue stick is often easier for beginners.
How do I make the two-tone effect look best?
Alternate the colors in a regular pattern, like A, B, A, B. This creates a balanced, interlocking look. Avoid placing all of one color on one side, as that creates a stark contrast.
Why does my honeycomb ball not expand evenly?
Usually it's because the glue dried unevenly or you pulled too hard from one side. Let the glue dry completely, then twist gently from both ends to encourage even expansion.



Leave a Comment