
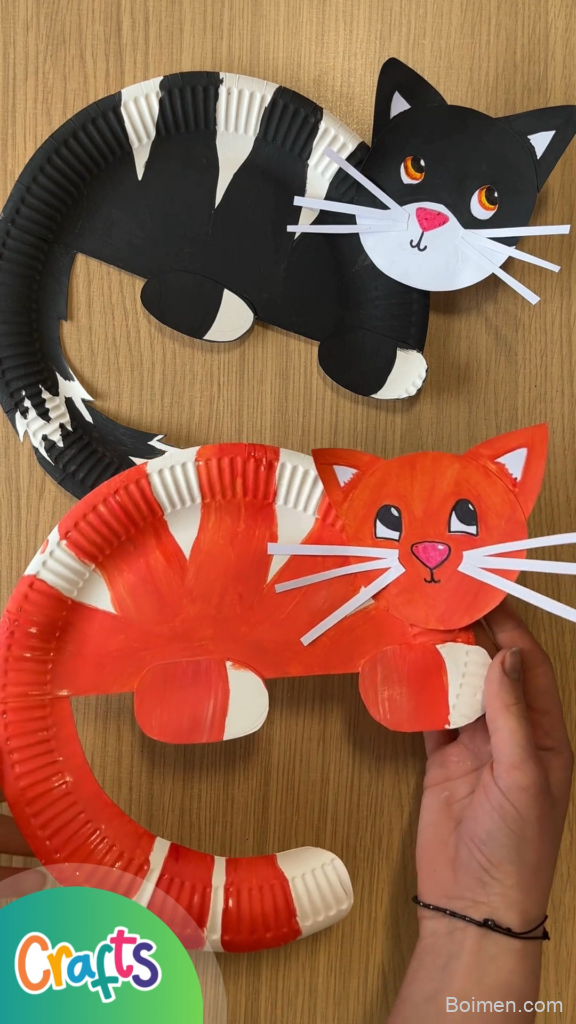
Looking for a craft that's quick, cute, and uses stuff you already have? This paper plate cat is it. In 15 minutes, you'll turn a plain plate into a playful feline friend that kids will adore.
Advertisements1
- A paper plate cat craft takes about 15 minutes and uses basic supplies like a plate, markers, and glue.
- Cutting ears from the plate itself saves a step and makes the cat more durable.
- Let kids personalize their cat—it boosts creativity and ownership of the project.
- Use a glue stick for paper parts and liquid glue for heavier items like googly eyes.
- Variations like cat puppets or masks extend the fun and make it reusable.
Why a Paper Plate Cat? Because Simple Wins
Ever notice how kids often prefer the box over the toy? Same principle here: a paper plate cat is delightfully low-tech and high-fun. It taps into the magic of making something from nothing—like turning a plain pancake into a smiley face with chocolate chips. Plus, it's a sneaky way to build fine motor skills and creativity without anyone suspecting it's educational. And let's be honest: cats are the internet's favorite animal, so you're basically crafting a tiny celebrity.
Gather Your Supplies: The Short List
You don't need a craft store explosion. Here's the core: one paper plate (any size, but 9-inch is standard), scissors, glue stick or white school glue, and markers or crayons. For extra flair, grab googly eyes, yarn, or scrap paper. A black marker is your best friend for drawing whiskers and a nose. If you have a hole punch, great—if not, a grown-up can poke holes with a skewer. Remember: this is a no-pressure zone. If you're missing something, improvise. No googly eyes? Draw them on. No yarn? Cut thin strips of paper.
Step-by-Step: From Plate to Purr
First, decide on your cat's look. Will it be a sleek black cat, a classic orange tabby, or a wild rainbow cat? Let your kid choose—it's their masterpiece. Next, fold the paper plate in half to create a crease, then unfold. This gives you a center line to work from. Now, cut two triangles from the top edge for ears. If you're using a full plate, you can also cut a small notch at the bottom for a chin. Then, color the plate. Use markers, crayons, or paint—whatever you have. Let it dry if using paint. After that, glue on the ears if you cut them separately, or just fold them up if you cut them from the plate itself. Add eyes (googly or drawn), a triangle nose, and whiskers (yarn, paper strips, or drawn lines). Finally, if you want a tail, cut a strip from the leftover plate edge and glue it to the back. Voilà! A cat that won't knock things off your table.
Pro Tips for a Purr-fect Result
Tip 1: Use a glue stick for paper parts—it's less messy and dries faster than liquid glue. Tip 2: If you're drawing whiskers, start from the nose and flick outward. It looks more natural. Tip 3: For a 3D effect, bend the ears slightly forward. Tip 4: Let kids add their own touches—maybe a collar, a bow, or even a tiny hat. The goal is fun, not perfection. And if the cat ends up looking more like a blob, call it a modern art cat. Problem solved.
Beyond the Basics: Variations to Try
Once you've mastered the classic, why not branch out? Make a cat family with different sizes: use a large plate for the parent and small dessert plates for kittens. Create a cat puppet by gluing a craft stick to the back. Turn it into a mask by cutting out eye holes. Or, go seasonal: a black cat for Halloween, a heart-nosed cat for Valentine's Day. You can also use the same technique to make other animals—dogs, lions, bears. The paper plate is your canvas. Let imagination lead.
Troubleshooting: When Things Go Sideways
Does your cat look more like a potato? No worries—add ears and whiskers, and it'll be feline enough. Are the googly eyes falling off? Use a stronger glue like Tacky Glue. Is the plate flimsy? Glue it to a second plate for sturdiness. Did a kid get marker on the table? Rubbing alcohol takes it off most surfaces. And if the craft ends in tears? Distract with a real cat video. Works every time.
How to Do It, Step by Step
- 1Fold and Crease
Fold the paper plate in half and press down to make a visible crease. This gives you a center line to align the face features, so your cat doesn't end up cross-eyed. - 2Cut Out Ears
On the top edge of the unfolded plate, cut two triangles for ears. Make them about 2 inches tall. If you cut them from the plate itself, you won't need to glue them on. - 3Color the Plate
Use markers, crayons, or paint to color the entire plate. Let kids go wild—cats come in all colors, even purple with polka dots. - 4Add Facial Features
Glue on googly eyes or draw them with a marker. Add a triangle nose (a small pom-pom or drawn) and whiskers (yarn, paper strips, or drawn lines). Position the nose in the center, just below the eyes. - 5Attach a Tail (Optional)
Cut a strip from the leftover plate edge, color it, and glue it to the back of the plate. Let it dry completely before playing. - 6Let It Dry
If you used liquid glue or paint, wait 10-15 minutes for everything to set. This prevents smudges and ensures the cat stays together.
The best crafts are the ones where the process matters more than the product—and a paper plate cat is proof that simple can be spectacular.
Frequently Asked Questions
What materials do I need to make a paper plate cat?
You need a paper plate, scissors, glue, and markers or crayons. Optional: googly eyes, yarn, and scrap paper for extra details.
How long does it take to make a paper plate cat?
About 15 minutes for the basic version, plus drying time if you use paint or liquid glue. It's a quick craft perfect for short attention spans.
Can I make this craft with preschoolers?
Yes, with adult help for cutting. Preschoolers can color, glue, and stick on features. Pre-cut the ears and whiskers to make it easier.
What can I use instead of googly eyes?
You can draw eyes with a marker, use stickers, or cut small circles from paper. Buttons also work if supervised.
How can I make the paper plate cat stand up?
Glue a craft stick to the back as a handle, or attach a folded paper strip as a stand. You can also glue it to a second plate for sturdiness.

Kwame writes about technology and digital privacy for everyday users. He breaks down complex topics like data tracking and encryption into simple, relatable terms.


Leave a Comment