
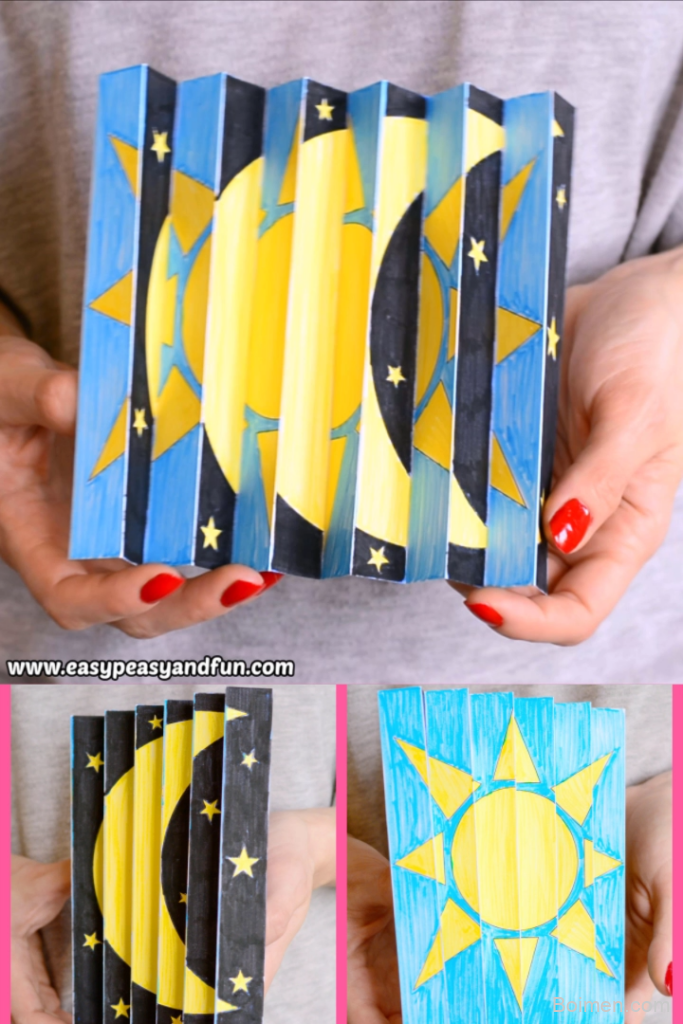
Ever wished a drawing could magically flip from day to night with just a tilt of your hand? That's the magic of an agamograph—and with the right template, your kids can create one in under an hour. Here are seven playful hacks to make the process smooth, creative, and totally wow-worthy.
Advertisements1
- Use cardstock and pre-score folds for crisp, lasting agamographs.
- Wider strips (2cm) make the illusion clearer for young kids.
- Glue sparingly with a glue stick to prevent warping.
- A simple gradient background amplifies the day-to-night transition.
- Encourage personal drawings once the template is mastered.
What Exactly Is a Night and Day Agamograph?
An agamograph is a picture that changes depending on the angle you view it from. Imagine holding a piece of paper that shows a sunny day scene, then tilting it slightly to reveal a starry night—it's like a paper optical illusion. The name comes from Yaacov Agam, an Israeli artist who pioneered this kinetic art form.
The night and day theme is perfect for kids because it's a clear contrast: bright yellows and blues for day, deep purples and blacks for night. You'll need a template with two interleaved images—one day, one night—sliced into vertical strips. When you fold the strips accordion-style, each side shows a different picture. It's a fantastic STEAM project that blends art, math (measuring strips), and a bit of physics (how light reflects at angles).
Why does it work? Your brain interprets the changing pattern as a single image because of persistence of vision—the same principle behind flipbooks. The accordion folds create alternating surfaces, so from the left you see one image, from the right the other. Kids love the 'magic' reveal, and it's a sneaky way to teach angles and symmetry. One common mistake: using flimsy paper that flops and blurs the images. Cardstock or 120gsm paper holds crisp folds and makes the illusion pop.
Hack 1: Choose the Right Template (And Why It Matters)
Not all agamograph templates are created equal. Look for ones with clearly numbered strips and a 1:1 aspect ratio—meaning the day and night images are the same size and align perfectly. A good template has a 2cm strip width, which is easy for little hands to cut and fold. Avoid templates with tiny 0.5cm strips; they're fiddly and the final image becomes muddy.
Why it works: Wider strips mean each image is more visible when viewed from an angle. If strips are too narrow, your eye blends them together and the illusion weakens. Also, templates with a light gray cutting guide are easier to follow than bold black lines that might show through.
Common mistake: Printing on both sides of the paper without checking alignment. Always print the day image on one sheet and the night image on another, then cut and interweave. Or use a template designed for single-sided printing with fold lines. Double-sided printing often misaligns and ruins the effect.
Hack 2: Master the Accordion Fold for Crisp Reveals
The accordion fold is the heart of the agamograph. Here's the trick: pre-score every fold line with a bone folder or the back of a spoon before folding. This compresses the paper fibers and ensures sharp, even creases. Fold one strip forward, the next backward, like a fan. If you're using a template, the fold lines are usually marked with dashed lines.
Why it works: Pre-scoring prevents the paper from cracking and makes the folds uniform, so the images align perfectly when viewed. Uniform folds mean the angle of view is consistent across the whole piece, making the transition seamless.
Common mistake: Folding all strips in the same direction. That creates a flat sheet, not an accordion. Remember: mountain, valley, mountain, valley. A quick way to check: after folding, the paper should stand up like a fan when you pinch the bottom.
Hack 3: Use a Glue Stick Sparingly (And Why Less Is More)
When attaching the day and night images to the accordion base, use a glue stick rather than liquid glue. Apply a thin, even layer only on the edges and along the fold lines—not the whole strip. A little goes a long way. If you're using a template where you cut strips and glue them alternately, place a tiny dot of glue at the top and bottom of each strip.
Why it works: Liquid glue warps paper and creates bumps that distort the image. A glue stick dries fast and flat. By gluing only the ends, the strips can flex slightly when you tilt the agamograph, enhancing the 3D effect.
Common mistake: Over-gluing and causing the paper to wrinkle. If wrinkles appear, your agamograph will look lumpy and the images won't line up. Use a scrap piece of paper to press down and smooth as you go.
Hack 4: Add a Background That Enhances the Illusion
Mount your finished agamograph on a piece of black cardstock or a painted backdrop that complements both day and night. For a night and day theme, a gradient background from yellow at the bottom to dark blue at the top works beautifully. This frames the agamograph and makes the transition feel like a sunrise or sunset.
Why it works: The background provides a visual anchor and increases contrast. When the agamograph shifts from day to night, the background gradient reinforces the change, making it more dramatic. It also hides any uneven edges.
Common mistake: Choosing a busy patterned background. It competes with the agamograph and distracts from the illusion. Keep it simple: solid colors or a smooth gradient.
Hack 5: Display It at Eye Level for Maximum Wow
Place the agamograph on a shelf or table where kids and adults can view it from different angles. The best height is around 4-5 feet (for adults) or lower for kids. You can also hang it on a wall and encourage viewers to walk past it to see the change. For a fun twist, attach it to a lazy Susan so it can rotate.
Why it works: Agamographs rely on the viewer's angle. At eye level, the change is most noticeable. If it's too high or too low, people might miss the effect.
Common mistake: Putting it behind glass or in a frame that restricts viewing angles. The glass reflects light and the frame limits the angle, killing the illusion. Keep it open and accessible.
Hack 6: Personalize with Drawings Instead of Printables
Once kids get the hang of the template, encourage them to draw their own day and night scenes. Use the template as a guide: draw on two separate sheets, cut into strips, and assemble. They can choose any theme—a city skyline, a forest, or even a character that changes costume.
Why it works: Personalization boosts engagement and creativity. It also teaches planning: they must consider how the two images will interleave. This is higher-level thinking and makes the project more meaningful.
Common mistake: Drawing images that are too detailed. Fine details get lost when cut into strips. Stick to bold shapes and strong contrasts—like a sun vs. a moon, or a tree with leaves vs. bare branches.
Hack 7: Troubleshoot Common Agamograph Glitches
If the image looks blurry from the side, check your strip width—it might be too narrow. If the accordion won't stay folded, try using a clothespin to hold it while gluing. If the two images don't align, you may have mismatched the strip order; double-check that strip 1 day is next to strip 1 night, and so on.
Why it works: Most issues stem from alignment or folding. By systematically checking these, you can fix the illusion quickly.
Common mistake: Giving up too soon. Agamographs are forgiving—you can usually trim or re-glue. Keep a spare template on hand for a do-over.
The Hacks, Step by Step
- 1Print the Template on Cardstock
Use 120gsm cardstock for durability. Print the day and night images on separate sheets. Check that the strip numbers align. - 2Score and Fold Along the Lines
Use a bone folder or spoon to score every dashed line. Fold accordion-style: first strip forward, second backward, and so on. - 3Cut the Strips
Cut along the solid lines to separate the strips. Keep them in order—use a numbered tray or lay them out sequentially. - 4Interweave Day and Night Strips
Glue the day strip 1 to the night strip 1, then attach to the accordion base. Alternate day and night strips as you go. - 5Glue Sparingly and Press Flat
Apply a thin line of glue stick along the edges only. Press with a scrap paper to smooth. Avoid over-gluing. - 6Mount on a Background
Attach the finished agamograph to a black or gradient background using double-sided tape. This enhances contrast. - 7Display and Test the Angles
Place at eye level. View from left and right to see the day/night switch. Adjust lighting for best effect.
The magic of an agamograph isn't in the paper—it's in the angle, and that's a lesson in perspective kids carry far beyond craft time.
Frequently Asked Questions
What is a night and day agamograph?
It's a paper craft that shows two images—one day scene and one night scene—that change depending on the viewing angle. It works by interleaving strips of each image and folding them accordion-style.
What paper is best for agamographs?
Cardstock (120gsm or higher) is best because it holds folds and doesn't warp when glued. Regular printer paper is too flimsy and the illusion becomes blurry.
How do you make an agamograph template?
You can create one by taking two images of the same size, slicing them into equal vertical strips, and alternating them. Or download a ready-made template with numbered strips and fold lines.
Why is my agamograph not changing?
The most common reason is that the strips are too narrow or the folds aren't sharp. Ensure you have wide strips (at least 2cm) and pre-score every fold line.
What age is this craft suitable for?
It's ideal for kids aged 7 and up, but younger children can help with coloring and folding with adult assistance. The template makes it accessible for beginners.



Leave a Comment